
Introduction
When reading online C++ tutorials and training examples, one important feature is mostly overlooked: namespaces. They are used in real-life libraries and applications. With namespace, blocks of code can be isolated in big projects, therefore, name conflicts can be avoided. However, there is on caveat.
Basics
A namespace block can be defined like
namespace A{
    class X{};
    class Y{};
}
We can refer to X outside of namespace A with :: operator
namespace A{
    class X{};
    class Y{};
}

A::X x; // Note :: operator
Reveal content
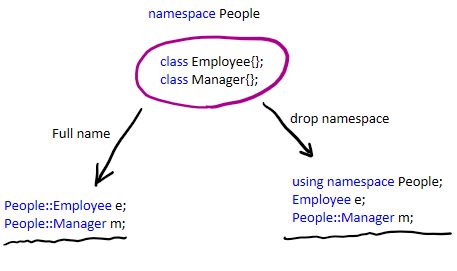
We can reveal all the content to a scope with using directive:
namespace People{
    class Employee{};
    class Manager{};
}
namespace Building{
    class Department{};
    class Room{};
}

using namespace People; // all content of People are visible in the code below
using Building::Department; // only Department is visible in the code below

int main(){
  Employee e; // OK
  Manager m; // OK

  Department d; // OK
  Room r; //Error: directly not accessible.

  return 0;
}
The using namespace directive can be declared inside a block or function, where it is valid only within those scopes:
namespace People{
    class Employee{};
}

void f(){
  using namespace People;
  Employee e; // OK
}

void g(){
    {
        using namespace People;
        Employee e; // OK
    }
    // Employee e; // Error: 'Employee' is not defined in this scope
}

// Employee e; // Error: 'Employee' is not defined in this scope
This strategy can make the code easier to read, especially when a function uses many symbols from a single namespace.
However, you cannot declare using namespace within a class:
class A{
    using namespace People; // Error: 'using directive' is not allowed
};
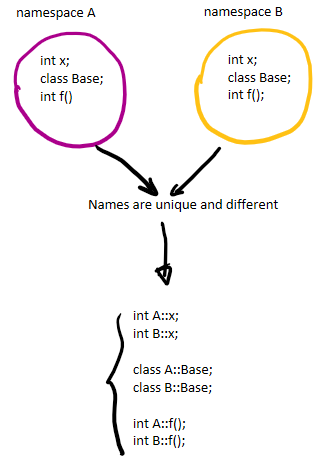
Names can be categorized to avoid conflicts
namespace A{class Base{};}
namespace B{class Base{};}

int main(){

  A::Base baseA; // OK
  B::Base baseB; // OK

  // But they conflict if namespaces thrown away.
  using namespace A;
  using namespace B;
  Base base;// Error: which one, A::Base or B::Base?

  return 0;
}
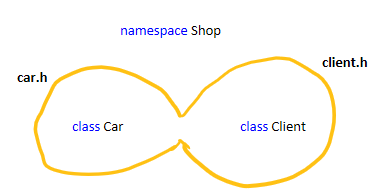
Namespace extension
A namespace can be extended with separated blocks, even in different files:
// car.h
namespace Shop{class Car{};}  // Car class added to Shop namespace

// client.h
namespace Shop{class Client{};} // Client class also added to Shop namespace

// app.cpp
#include "car.h"
#include "client.h"
int main(){
    Shop::Car car;
    Shop::Client client;
    return 0;
}
The global namespace
Any declaration outside of explicitly defined namespaces belongs to the global namespace. To specifically access the global namespace use ::SomeClass.
namespace MyProject {
  class Person{public: double height;};
}
class Person{public: int age;};

using namespace MyProject;

int main(){
    ::Person p; // OK, global Person is used.
    p.age=30;
  return 0;
}
Nested namespaces
We can have nested namespaces
namespace App{
    namespace Shape{
        class Box{};
    }
}
It is easier to write the above code as:
namespace App::Shape{
    class Box{};
}

int main(){
    App::Shape::Box box; // Access nested parameter
    return 0;
}

Namespace aliases
We can create an alias for a long name or nested namespace:
namespace Zoo::Animal::Birds{ class Penguin{};}

namespace ZAB = Zoo::Animal::Birds;
int main(){
  ZAB::Penguin p;
  return 0;
}
Use aliases in source (.cpp) files. Avoid using them in header (.h or .hpp) files as they will propagate wherever the headers are included.
Namespace content
Everything, except the main function, can be declared/defined in a namespace:
namespace A{
  int x;
  using mint = int;
  class person{};
  struct data{};
  void func(){};
  namespace B{/*more definitions*/};
}

int main(){
  A::x = 10;
  A::mint j;
  A::person p;
  A::data d;
  A::func();
  return 0;
}
Unnamed namespace
Unnamed or anonymous namespaces are used to ensure internal linkage for symbols of a translation unit (a cpp file including its headers). At times, you may want to have private symbols (classes, functions, or variables) specific to a translation unit. To do so, we add them to the cpp file inside an unnamed namespace.
In the example below, both add and sqAdd translation units accidentally have two separate private functions with the same name, helper:
// add.h
namespace MyProject
{ int add(int a, int b); }

// add.cpp
int helper(int a, int b)
{
    return a + b;
}

namespace MyProject
{
    int add(int a, int b)
    {
        return helper(a, b);
    }
}

// sqAdd.h
namespace MyProject
{ int sqAdd(int a, int b); }

// sqAdd.cpp
int helper(int a, int b)
{
    return a*a + b*b;
}

namespace MyProject
{
    int sqAdd(int a, int b)
    {
        return helper(a, b);
    }
}

// main.cpp
#include "add.h"
#include "sqAdd.h"

int main(){
    MyProject::add(2,3);
    MyProject::sqAdd(2,3);
    return 0;
}
You can compile this with MS C++ cl:
cl -c add.cpp
cl -c sqAdd.cpp
cl main.cpp add.obj sqAdd.obj
We get a linkage error:
error LNK2005: "int __cdecl helper(int,int)" (?helper@@YAHHH@Z) already defined in sqAdd.obj
This is because both add.obj and sqAdd.obj expose their helper functions. To prevent them from exposing them to other units, we use unnamed namespaces:
// add.cpp
namespace{
  int helper(int a, int b)
  {
    return a + b;
  }
}

// sqAdd.cpp
namespace{
  int helper(int a, int b)
  {
      return a*a + b*b;
  }
}
Upon compiling it again, the helper functions will not be exposed.
Some points related to this topic are:
It is a good practice to always add tranlational unit’s private symbols in an unnamed namespace.
If it aligns with your coding style, you can achieve internal linkage by defining the helper functions as
static.Be cautious not to add symbols in an unnamed namespace to public headers to get private behavior, because the symbols will become visible wherever the headers are included.
Caveat: name lookup
Working with nested namespaces, we must know that, in enclosing namespaces, when a name is not found in a namespace, its parent is looked up for it, and search continues to the global namespace. The only way to avoid the lookup, is to address the name with its full symbol name like ::myProject::solarSystem::earth::orbit::Result. If you refer to Result in orbit namespace, C++ looks for Orbit::Result, if not found, tries earth::Result and so on.
Let’s show this with an example:
namespace parent{
    struct P1{string s="parent-P1"; };
    struct P2{string s="parent-P2";};

    namespace child1{
        struct P2{string s="child1-P2";};

        struct C11{
            P1 p1; // parent::P1
        };
        struct C12{
            P2 p2; // child1::P2
        };
        struct C14{
            parent::P2 p2; //enforce parent
        };

        struct S{};
    }

    namespace child2{
        struct S{};
    }
}
C11:P1is only defined inparent, butchild1uses it inC11without any mention of namespace.C12:P2is defined in bothparentandchild1. InC12, it is consideredparent::child1::P2.C14:P2is defined asparent::P2.
Unfortunately, this behaviour of name lookup can give wrong confidence in isolating names.
Sorush’s namespace method
The name lookup behaviour forces us to minimize the number of levels of namespaces. This doesn’t let us to categorize the names in depth, the way is done in Java or C#. Moreover, the intellisense suggestions are not as good as having nested namespaces.
To overcome the name lookup issue, I have a suggestion (I’ve never seen it before, so I call it Sorush’s method. Correct me if wrong). The idea is to create a sub-namespace own for each namespace. own contains names that don’t belong to any children and own doesn’t have any sub-namespaces. If we look at the namespaces as a tree, the names are only stored in leaves, and there are no names in the ancestors of a leaf. Therefore, name lookup cannot use ancestor names in children scopes.
                 parent
  ----------------------------------------------------
  own          child1             child2::own
          ------------------------------
         own   child11::own  child12::own
The code for this example is:
namespace parent{
    namespace own{
        int i=0;
        int j=0;
    }
    namespace child1{
        namespace own{
          //  int val=j; // Error: parent::own::j not accessible here.
          //  int val= own::j; // Error: not accessible.
            int val = parent::own::j; // OK
            int i=1;
        }
        namespace child11::own{
           //     int val = i; // Error: no i from ancesstors accessible
                int i=11;
        }
        namespace child12::own{
                int i=12;
        }
    }
    namespace child2::own{
          int i=2;
    }
}
You can also organize files in sub-folders the same tree as namespaces.
How to use namespaces
- Choose one namespace for the project, all project code are encompassed by it.
- If you don’t use my method above, due to the name lookup behaviour, avoid deeply nested namespaces. One level namespace, the project name, is great, two levels are OK, three levels needs thinking twice, four levels or more are unusual. For example, standard library,
std::, in its one level contains a large number of names. - Make sure namespaces have unique names. For example, don’t define
math::solver::mathormath::math. - Never create
stdnamespace or a namespace that is the same as an included or famous library for example,BoostandEigen.
References
Isocpp microsoft docs Tips of the week google style guide